Crack the Shell: A Professional Shucking Masterclass for Home Entertainers
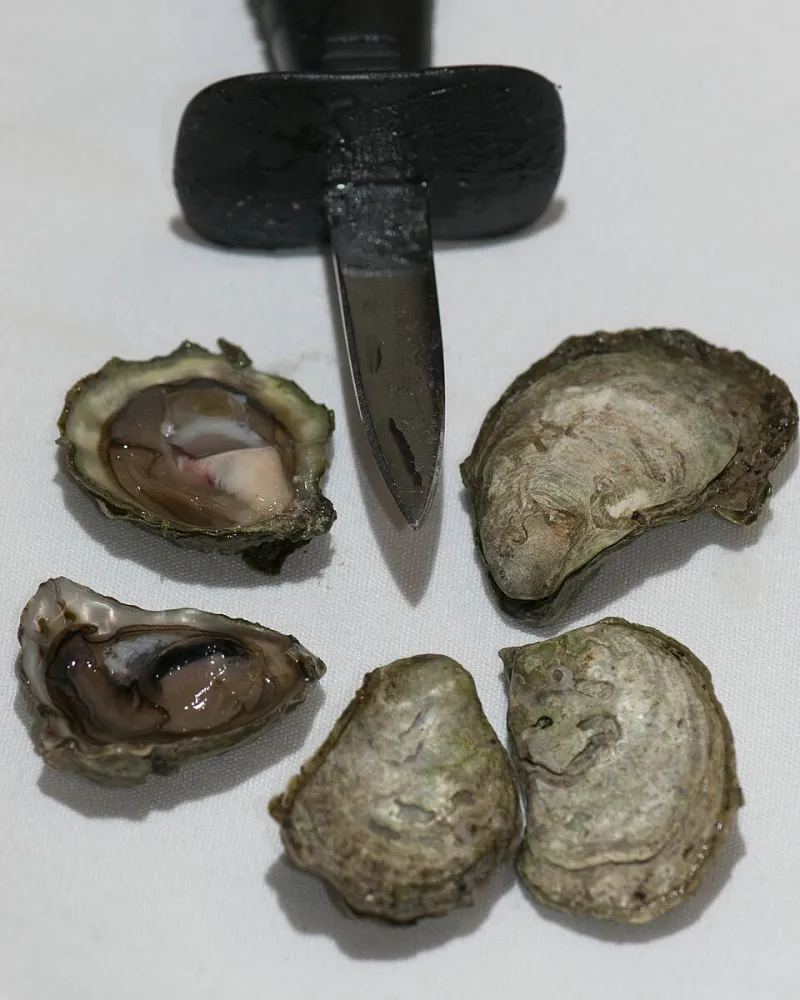
Photo: VIUDeepBay, CC BY 2.0, via Wikimedia Commons
Watching a seasoned shucker at a busy oyster bar is something between performance and craft. With a practiced flick of the wrist and the confidence of repetition, they coax open shell after shell in a matter of seconds, presenting each oyster in its liquor — pristine, unbroken, and ready for the table. For the uninitiated observer, the process can appear almost effortless, even mysterious.
The truth, however, is far more accessible. Shucking Harris Creek oysters at home is a learnable skill, one that rewards patience, proper preparation, and a willingness to practice. This guide will walk you through every stage of the process — from selecting your tools to presenting a finished platter — with the same methodical approach used by professionals at premier oyster bars across the country.
Why Shucking at Home Matters
There is an undeniable satisfaction in opening an oyster yourself. Beyond the practical benefit of freshness — an oyster shucked moments before consumption is at its absolute peak — there is a ceremonial quality to the act that enhances the entire dining experience. When you serve Harris Creek oysters that you have shucked with your own hands, you bring the journey from the bay to the table to its most personal conclusion.
Moreover, mastering this skill removes a significant barrier for home entertainers. Oysters on the half shell need no cooking, no complicated preparation, and no lengthy recipes. Once you can shuck, you can serve an impressive appetizer course in minutes.
Assembling Your Toolkit
Before a single oyster is opened, the right equipment must be in place. Attempting to shucker without proper tools is the most common mistake made by beginners — and one that frequently leads to frustration, broken shells, or injury.
The Oyster Knife: This is the single most important tool in your arsenal. An oyster knife is short, stout, and specifically designed for the task — it bears no resemblance to a standard kitchen knife and should never be substituted with one. Look for a knife with a comfortable, non-slip handle and a blade approximately three inches in length. Several regional styles exist: the New Haven style features a longer, thinner blade suited to East Coast oysters, while the Boston style offers a wider, more robust tip. For Harris Creek oysters — firm-shelled and moderately sized — either style performs admirably.
A Cut-Resistant Glove: Non-negotiable for home shuckers. A single-glove approach is standard: wear the glove on the hand holding the oyster and keep your dominant, shucking hand bare for maximum control. Cut-resistant gloves rated for kitchen use are widely available online and at kitchen supply retailers for under twenty dollars. This investment should not be skipped.
A Folded Towel: Even with a glove, many professional shuckers wrap the oyster in a thick, folded kitchen towel for additional grip and protection. This technique also prevents the oyster from sliding on the work surface.
A Shucking Board or Non-Slip Surface: A dedicated oyster shucking board — typically featuring a recessed cup to cradle the oyster — provides stability and prevents the shell from shifting during opening. In the absence of a specialized board, a damp kitchen towel laid flat on the counter serves a similar stabilizing function.
Crushed Ice and a Serving Platter: Prepare your presentation surface before you begin shucking. A bed of crushed ice on a large platter or a dedicated oyster tray keeps opened shells level and maintains the oyster's internal liquor — the flavorful brine inside the shell — in place until serving.
Step-by-Step: The Professional Method
With your tools assembled and your workspace prepared, you are ready to begin. Work deliberately and without rushing, particularly in your early sessions.
Step 1 — Inspect and Rinse Your Oysters: Begin by examining each Harris Creek oyster. Discard any with shells that are cracked, broken, or noticeably open and unresponsive to a gentle tap. Rinse the oysters under cold running water, using a stiff brush to remove any debris from the exterior of the shell. This step is about cleanliness — it ensures that no grit or shell fragments find their way into the finished product.
Step 2 — Position the Oyster: Hold the oyster in your gloved, non-dominant hand with the cupped, rounded side facing downward and the flat side facing upward. This orientation keeps the liquor pooled in the lower cup, preserving it throughout the shucking process. Wrap the oyster in the folded towel if additional grip is needed, leaving the hinge — the narrow, pointed end — exposed and accessible.
Step 3 — Locate the Hinge: The hinge is your point of entry. It is the small, slightly recessed notch at the narrow end of the oyster where the two shells meet and interlock. Insert the tip of your oyster knife directly into this point, applying firm, steady pressure. The goal at this stage is not to force the knife through; it is to find the precise mechanical weak point where the shells connect.
Step 4 — Apply Rotational Pressure: Once the knife tip is seated in the hinge, apply a twisting or rotating motion — similar to turning a key — rather than a prying or levering action. This rotational pressure will pop the hinge open with a satisfying click. Resist the urge to use the knife as a lever against the shell's edge, as this is the technique most likely to result in broken shell fragments contaminating the oyster.
Step 5 — Sever the Adductor Muscle: With the hinge open, slide the knife blade along the underside of the top shell, keeping it as flat and close to the shell as possible. You are severing the adductor muscle — the strong connective tissue that holds the two shells together. Use a smooth, controlled stroke. Once cut, the top shell will lift away cleanly.
Step 6 — Remove the Top Shell: Lift the top shell away and set it aside. Inspect the oyster: the meat should be plump, glistening, and fully intact, sitting in a small pool of clear to slightly milky liquor. Any shell fragments should be carefully removed with the tip of the knife or a clean finger.
Step 7 — Free the Meat (Optional): Professional shuckers often run the knife beneath the oyster meat to sever the second adductor muscle attaching it to the bottom shell. This step makes the oyster easier to eat directly from the shell without additional effort from the diner. Slide the knife flat along the interior of the cup shell to complete this step.
Step 8 — Present and Serve: Place the finished oyster, still in its cupped shell, onto your prepared bed of crushed ice. Continue shucking the remaining oysters and arrange them on the platter. Harris Creek oysters are best served within fifteen to twenty minutes of shucking for optimal freshness and temperature.
Common Mistakes and How to Avoid Them
Approaching from the Wrong Angle: Many beginners attempt to open the oyster from the bill — the wide, flared end — rather than the hinge. While some shuckers use this technique for certain oyster varieties, the hinge method is more reliable and universally applicable for Harris Creek oysters.
Using Excessive Force: Brute force is the enemy of clean shucking. If the knife is not entering the hinge smoothly, reposition it slightly rather than pushing harder. A well-placed tip requires surprisingly little force.
Losing the Liquor: Tilting the oyster or using a prying motion that causes the shell to flex dramatically will spill the liquor. Keep the oyster as level as possible throughout the process and prioritize smooth, controlled movements.
Skipping the Second Cut: Neglecting to sever the bottom adductor muscle leaves the oyster partially attached to the shell, which creates an awkward experience for the diner. Take the extra two seconds to complete this step.
Practice Drills for Building Confidence
Like any physical skill, shucking improves rapidly with deliberate repetition. Professional shuckers at competitive oyster festivals regularly open hundreds of oysters per session — speed and precision are products of accumulated practice.
For beginners, we recommend beginning with a practice session of one dozen Harris Creek oysters, working slowly and focusing on technique rather than speed. Film yourself from above using a smartphone to review your hand positioning and knife angle between attempts. Note which steps feel uncertain and isolate those for focused repetition in your next session.
Several instructional videos from professional shucking competitions — including those hosted by the Hog Island Oyster Company and various East Coast oyster festivals — are available on YouTube and provide valuable visual reinforcement of the techniques described here.
Within two or three practice sessions of one to two dozen oysters each, most home cooks report a marked improvement in confidence, speed, and the cleanliness of their shucked oysters.
The Reward Is Worth the Effort
There is a particular pride that accompanies setting a platter of beautifully shucked Harris Creek oysters before your guests, knowing that each one was opened by your own hand. It is a skill that speaks to a deeper engagement with food — an understanding that the finest ingredients deserve the attention and care of those who serve them.
From the bay to your table, Harris Creek oysters arrive carrying the character of the Chesapeake. How you open them is the final act of that journey. Do it well.